Ads by Google

Get This Pop-up Window


Wednesday 18 December 2013

How to : Setup a Static IP Address on the Samsung Galaxy S4


Having problems with the Wi-Fi internet on your Samsung Galaxy S4? 
Are you getting an “Obtaining IP address” message but cannot get your 
phone to connect to your home network or router? Setting up a Static 
IP address on your Android Smartphone might be the solution to your 
problem. This article is a step by step guide with pictures showing how to 
setup a Static IP Address on the Samsung Galaxy S4.
This guide can also be used as a reference for other brands of Android 
Smartphones running on Android Version 4.2 Jelly Bean (or similar Android 
OS versions) as well.

ANDROID VERSION 4.2

Quick Instructions:

Settings > Connections tab > Wi-Fi > Select the Network (hold down) >
 Modify network config > Show advanced options > IP settings > Static > 
Type in desired network information > Save.

Detailed Instructions with Pictures:

Tap the Menu key under the devices display (bottom left).
Tap Settings.
Make sure that the Connections tab is selected (upper left).
Tap Wi-Fi.
Tap and hold the Network that you want to use a Static IP Address on 
until additional options appear on the display.
Note: if you see a “Forget” option then you didn’t hold your finger down on 
the network long enough.
Tap Modify network config.
The phone will display 2 available options. Show password and Show 
advanced options.
Tap Show advanced options.
To adjust your Proxy Settings.
Note: you do not need to change the proxy settings on your phone in
 order to set a static IP address. But I am going to briefly demonstrate
 the process should you choose to do so.
Tap on the Proxy settings option shown, the default is usually set 
to none.
Select Manual.
Scroll down and enter the information for the Proxy you would like your
 phone to use.
To set your static IP Address
Tap IP settings.
DHCP is often the default setting used.
Select Static.
Tap on the fields that you want to edit and set manually.
Type the desired information provided by your ISP (Internet Service 
Provider).
Click Save.
And you’re Done!

WI-FI PROBLEMS

If you are having issues with your Android phone not connecting to a 
wireless network and setting the phone to use a Static IP Address 
doesn’t help solve the problem then I recommend that you try some of
 the suggestions listed at How to Fix the Wi-Fi on an Android Smartphone.

ENJOY

I hope you found this article informative and helpful, if so then don’t forget
 to press the Facebook Like button or Google + button or leave a comment
 below to let me know. Don’t hesitate to also check out some of the other
 awesome content throughout the site as well. Enjoy.

How to : Bypass Blocked Sites

So you’re at work or school and you want to check your profile or watch a YouTube video. Lo and behold, it’s blocked. Now you have two options – be productive or try and bypass the filter. Usually one would choose the latter, but how would you do that? Here’s some options.


UltraSurf & FreeGate

proxy bypassThis has recently become my favorite software tool for bypassing blocked web sites. UltraSurf & FreeGate is seriously one of the best tools for the job. There is no install, so download the “exe” file onto a USB drive and run it whenever you need it.


When you open it up, it will open Internet Explorer with the UltraSurf & FreeGate homepage. From there the web is your oyster.

But why do I like it so much? First of all, it’s fast, it routes you through a possible three servers so you get highly reliable speeds. Second, it uses IE which is what you have if you’re on IT lockdown, so it doesn’t look suspicious and you don’t need to have two different browsers open at the same time. Also, since it uses your existing browser, things like Flash and Java will work like normal. Once you close UltraSurf it will erase your history and cookies. [Windows]

Thursday 12 December 2013

How to : Join a Mac to a Windows Domain

How to Join a Mac to a Windows Domain
Tell me if this sounds familiar. You come into work one day and your boss calls you into his office and says he got a new laptop. You arrive at his office door and realize your boss bought a Mac. He wants to be able to access all the company files stored on your Windows domain from his new Mac. Or maybe the scenario is a bit different. Your company decides to create a new department for graphical design and marketing and all the designers use Macs.
So what do you do? Not to worry, you can join a Mac to your Windows domain and today I’m going to show you how it’s done. Let’s walk through joining Snow Leopard to a Windows Server 2008 domain.

Setting Network and User Options on a Mac

Windows domains rely on DNS for Active Directory to work correctly so the first thing we need to do is set a static DNS address on your Mac. We need to use the IP address of your Windows domain controller for this setting. From your dock open System Preferences or click the Apple in the top left corner and choose System Preferences. Now click Network to open your network settings.
How to Join a Mac to a Windows Domain
Now you should be at your Network settings screen.
How to Join a Mac to a Windows Domain - 2
By default your network adapter is set to DHCP. Depending on the network connection you are going to use you will need to change this setting toManually.
Keep in mind if you are setting a static address on your Mac and you take it to another network you might need to change this setting back to DHCP. I would suggest using the wired or Ethernet connection for your static address and use the wireless for DHCP. In this example I am setting a static address on the Ethernet connection.
My Windows domain controller has an IP address of 192.168.1.172 so I will put this in the DNS section. I’m setting my IP address to 192.168.1.171 for this example. Fill in your IP address, subnet, gateway, and DNS according to your network settings.
How to Join a Mac to a Windows Domain - 3
Click the back button to go back to System Preferences and chooseAccounts
How to Join a Mac to a Windows Domain - 4
Click the Lock to make changes to these settings. Then click the Join button next to Network Account Server
How to Join a Mac to a Windows Domain - 5
Now click the Open Directory Utility button
How to Join a Mac to a Windows Domain - 6
You should now be at the Directory Utility; click the Lock to make changes. Then make sure Active Directory is checked, highlight it, and then click the Pencil to edit this setting.
How to Join a Mac to a Windows Domain - 7
Here you can enter your domain information and computer ID. For this example the domain is hq.test.us and the computer ID is Mac. The computer ID is the computer name that will show up in Active Directory once the Mac is joined to the domain.
How to Join a Mac to a Windows Domain - 8
Click the arrow to Show Advanced Options. This gives you 3 extra options you can configure. To keep it simple I usually leave these settings default except for the Administrative section. Click the Administrative button and enter the IP address or the FQDN of your domain controller in the Prefer this domain server section. For this example I used the IP address of my domain controller192.168.1.172. You can also specify groups that are allowed administration privileges.
How to Join a Mac to a Windows Domain - 9
Now click the Bind button and you will be prompted for credentials. Enter your domain administrator username and password and click OK.
How to Join a Mac to a Windows Domain - 10
You should see it progress through steps 1-5 as you are authenticated and joined to the domain.
How to Join a Mac to a Windows Domain - 11
Now you should be joined to the domain and the Bind button changes toUnbind.
How to Join a Mac to a Windows Domain - 12
Click OK and then click Apply in the Directory Utility window. Then close the Directory Utility. Now you should be back at the Accounts window. Note the green dot and domain name next to Network account server.
How to Join a Mac to a Windows Domain- 13

Logging In with Windows Credentials on Your Mac

Now you should be able to login to the Mac with your Windows domain credentials. Log off the current user you are logged in with. When you get back to the login screen choose Other.
How to Join a Mac to a Windows Domain - 14
Now enter your Windows domain credentials.
How to Join a Mac to a Windows Domain - 15
That should get you logged into the computer with your domain credentials. So now what? How do you access the files on the server?
We will need to map drives to the shared folders on the server so you can access the files. From Finder click Go then click Connect to Server. Since Mac uses SMB we need to use this syntax: smb://servername/share then clickConnect.
How to Join a Mac to a Windows Domain - 16
Note that you will not be prompted for credentials to connect because we are logged in with our domain account. You can also connect to Windows shared folders with the same syntax and a username and password if your Mac is not joined to the domain.

How to : Setting Up A Windows Server 2012 Domain Controller

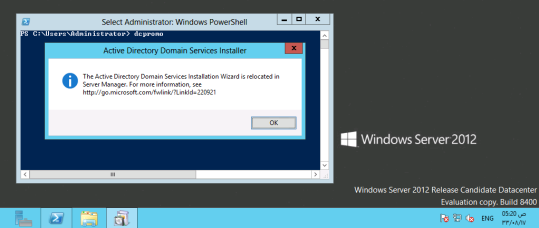
In Windows Server 2012, dcpromo has been deprecated.
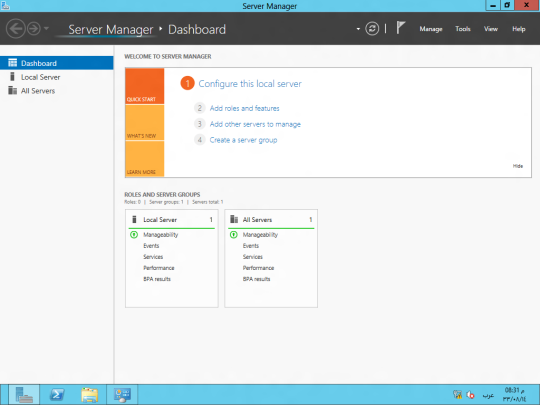
In order to make the windows server 2012 domain controller we will install ADDS (Active Directory Domain Services) role from the server manager on Windows Server 2012.
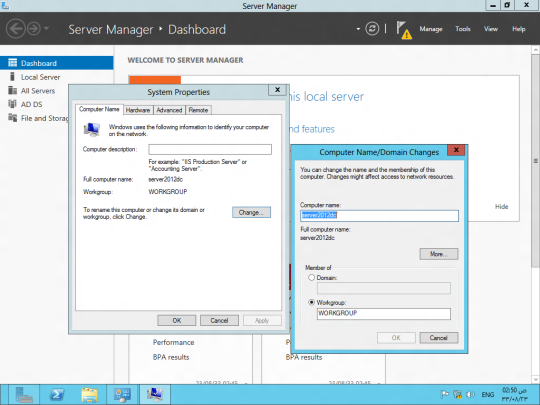
First we will change the server name let say server2012dc and  the IP address 10.10.21.1 (try to avoid using default 192.168.0.1)


INSTALLING AD DS ROLE

“Before You Begin” screen provides you basic information such as configuring strong passwords, IP addresses and Windows updates.
On Installation Type page, select the first option “Role-based or Feature-based Installation“.
Scenario-based Installation option applied only to Remote Desktop services.
On the “Server Selection” Page, select a server from the server pool and click next.
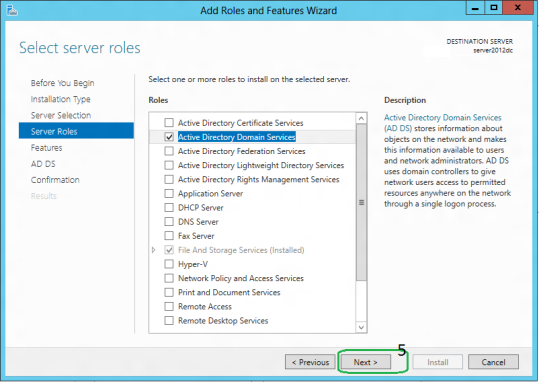
To install AD DS, select Active Directory Domain Services in turn it will pop-up to add other AD DS related tools. Click on Add Features.
After clicking “Add Features” above, you will be able to click “Next >” as shown in the screen below.
On the “Select Features” Page, Group Policy Management feature automatically installed during the promotion. Click next.
On the “Active Directory Domain Services” page, it gives basic information about AD DS. Click Next.
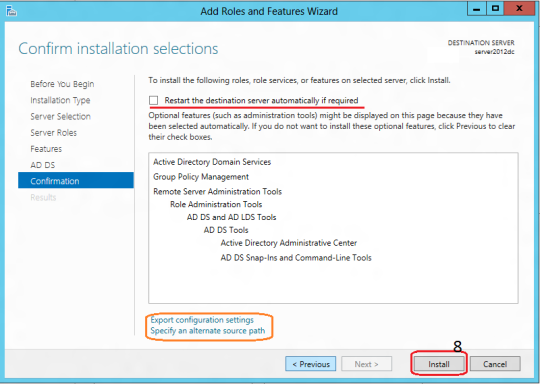
On the “Confirmation” Page, You need to confirm this to continue with this configuration. It will provide you an option to export the configuration settings and  also if you want the server to be restarted automatically as required.
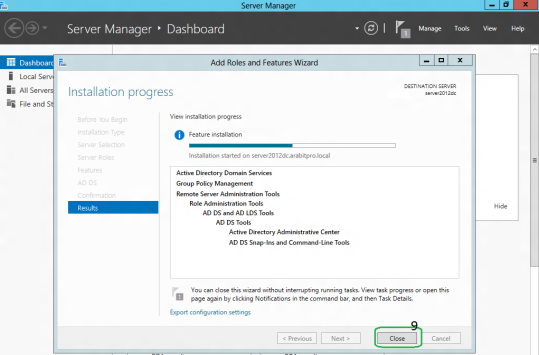
After clicking “Install” the selected role binaries will be installed on the server.
After “Active Directory Domain Services” role binaries have been installed and now it is time to promote the server to a Domain Controller.


TechNet Article:


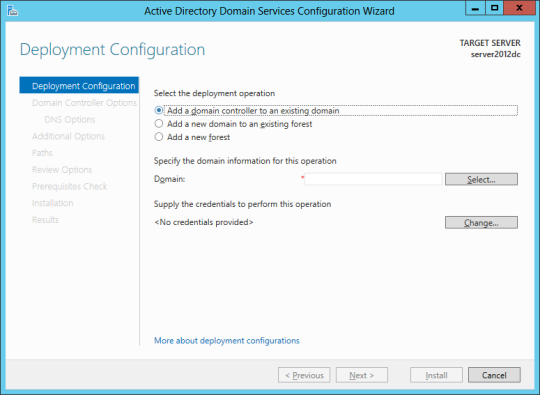
PROMOTING WINDOWS 2012 SERVER TO DOMAIN CONTROLLER

To create a new AD forest called “ArabITPro.local”, select add a new forest.
Type the name ArabITPro.local
Specify the FFL, DFL, whether or not it should be a DNS Server and also the DSRM administrator password. As you can see, it has selected the GC option by default and you cannot deselect it. The reason for this is that is the very first DC of the AD forest and at least one needs to be a GC.
DNS delegation warning.
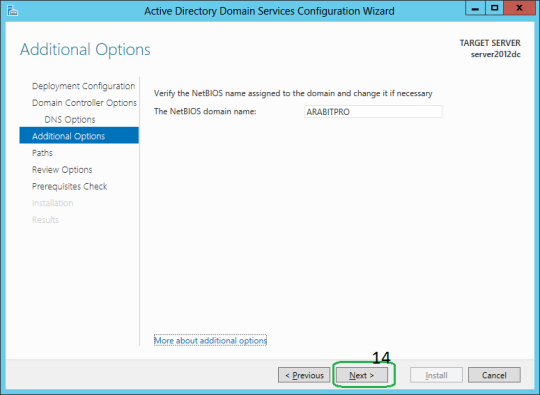
Checks the NetBIOS name already assigned.
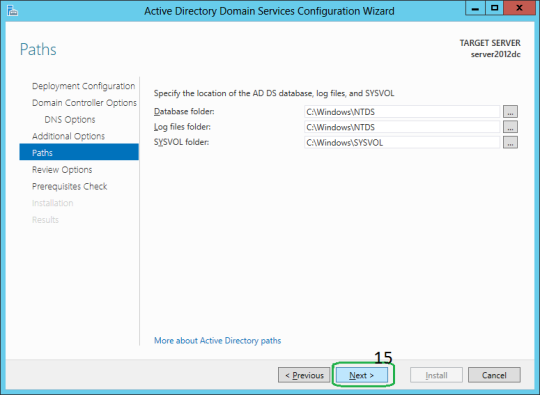
Specify the location of the AD related folders and then click next.
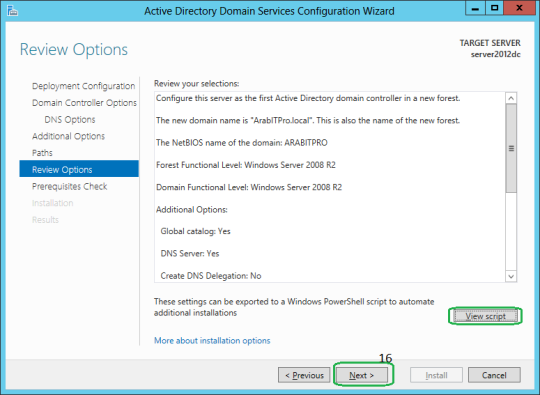
Summary Of All Installation Options/Selections.
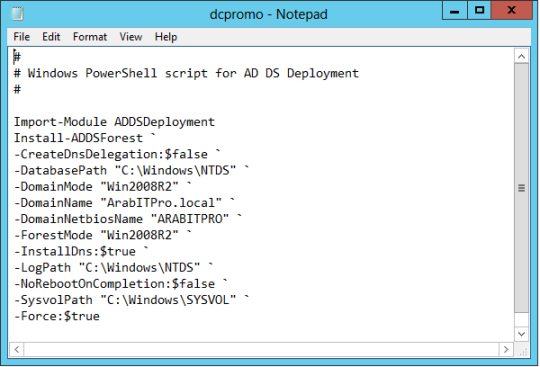
Click View script for single command  line PowerShell script for dcpromo.
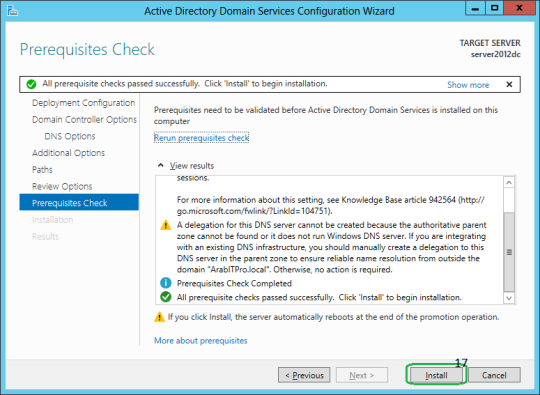
Before the actual install of AD, all prerequisites are checked. If All prerequisite checks are passed successfully then click Install.
When you click Install, DNS and the GPMC are installed automatically.
After the promotion of the server to a DC finished server restart automatically.
Once the server is booted and you logon to it, click on  Server Manager | Tools ,  will notice that following have been installed :
   •   Active Directory Administrative Center
   •   Active Directory Domains and Trusts
   •   Active Directory Module for Windows PowerShell
   •   Active Directory Sites and Services
   •   Active Directory Users and Computers
   •   ADSI Edit
   •   DNS
   •   Group Policy Management