


The Outlook Connector client-side plugin is available as a stand-alone installer that
can be downloaded from within WorldClient. If you do not have access to
WorldClient then contact your supervisor or email administrator to obtain the plugin
by some other means, such as on a disk or via an alternate
download location.
Downloading the Outlook Connector plugin
To download the Outlook Connector plugin from within
WorldClient:

1. Open your web browser to WorldClient’s sign-in page.
In most cases, the address of the sign-in page is
something like, “http://mail.mrtice.com.my” or
“http://192.10.10.2”
2. Type your email address and password in the spaces
provided, and click Sign In.
3. Click Options (or click the Options button if the
WorldClient theme you are using has buttons instead of
text links).
4. Click Outlook Connector.
5. Click Download Outlook Connector.

6. In the File Download dialog, click Save, choose a
location for OutlookPluginInstall.exe (remember
this location), and then click Save to begin the download.
Installing the Outlook Connector Plugin
To install the Outlook Connector plugin:
1. Close Microsoft Outlook if it is running. Before continuing with the
installation, it is also recommended that you exit all other Windows
applications that you may have running.
2. Click Start, and then click Run… on the Windows start menu.
3. In Open, type the path to OutlookPluginInstall.exe, or click Browse… to
locate it.
4. Click OK.

5. Click Next.
6. Read the License Agreement and then click I Agree to continue with the
installation.
7. Click Next.
8. Click Finish
Configuring the Outlook Connector Plugin
Configuring a Mail Profile for Outlook Connector
In order to use Outlook Connector you must create a new Outlook mail profile.
These instructions show how to setup a new profile for Outlook Connector. They
begin with the Mail Control Panel open (the Mail control panel is located in the
Control Panel reached from the Windows Start menu).
1. Use the Add command button to display a dialog for naming the new profile.
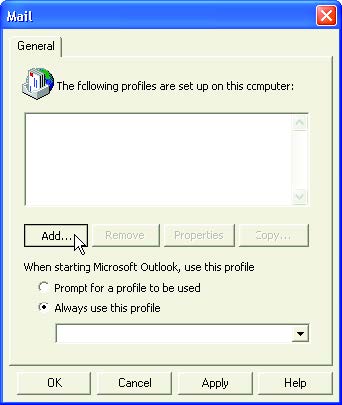
2. Type the profile name and click OK.

3. Select Add a new e-mail account and click Next.

4. Select Additional Servers Types and click Next.

5. Choose Outlook Connector… from the list and click Next.

6. Enter the requested information. Once you have entered the ID, password
and server information, click Test Account Settings. If everything is
correct, the setup program displays a message saying: Successfully
connected….

7. Once the test is successful, use the OK button to exit from the dialog. Then
use the OK button to exit from the control panel.
You should now be able to start Outlook with Outlook Connector active.
NOTE: Once your account has been created, you can easily access it to
review or edit its settings via the Account button on the toolbar.

No comments:
Post a Comment